
What do you do with this stuff? is the number one question I get asked about laminated cotton. Because of the great texture we are all drawn to it. My answer is always: rain coats, umbrella covers, bags (great for a wipeable inside especially with cosmetics or lunch bags), tablecloths, placemats and so much more. Laminated cotton can be a little difficult to sew only because it wants to stick like saran wrap to the foot of your machine. In this project I have overcome that with the use of hand-made bias tape.
Here's a little project I was asked to create for someone and thought I would share with you how I went about creating it.

Materials:
Approx 1 1/2 yards laminated cotton.
(Laminated cotton comes in about 55" width so we used the full width but you could certainly make this smaller.)
2 1/2" bias tape

Get your fabric cut to the same measurement as the width then fold diagonally to create a a triangle. This will make your piece a square.

Next fold again meeting points and forming another triangle.


You will now have two edges that are folded. Measure the shortest folded edge and then move the measuring tape from the point and keep marking that measurement along the edge. This will create your curved edge as shown below.

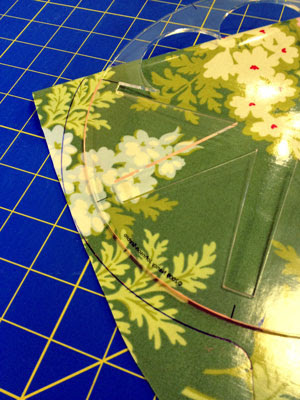 To create a scalloped edge... I opened up the tablecloth just once from all that folding so it's easier to cut. You can use any curved edge (bowls are great here) but I had this curved ruler which served me well.
 Between the top of the curves I left about a 1/2" space and then
hand drew in a curve to connect the lines. This is so that when
attaching your bias tape it will be much easier to manipulate.
Between the top of the curves I left about a 1/2" space and then
hand drew in a curve to connect the lines. This is so that when
attaching your bias tape it will be much easier to manipulate.
 Cut out all your curves. When you get to the folded edges you may need to do some adjustments. I found that I was slightly off in the curve but I was able to make it look fine with a little extra cutting and shaping. Not even noticeable if you didn't know it was there.

Next you will want to make your bias tape. If you don't know how there are a ton of tutorials out there. You are first attaching the bias tape to the back of the table cloth.
 Flip the bias tape over to the front and the big trick for this last step is lots of pins! I made one of these tablecloths without pinning and it was a big mess of puckers. Next stitch close to the inside edge of the bias tape and your are done!

Here's a little project I was asked to create for someone and thought I would share with you how I went about creating it.

Materials:
Approx 1 1/2 yards laminated cotton.
(Laminated cotton comes in about 55" width so we used the full width but you could certainly make this smaller.)
2 1/2" bias tape

Get your fabric cut to the same measurement as the width then fold diagonally to create a a triangle. This will make your piece a square.

Next fold again meeting points and forming another triangle.

Then fold one more time.

You will now have two edges that are folded. Measure the shortest folded edge and then move the measuring tape from the point and keep marking that measurement along the edge. This will create your curved edge as shown below.


Next you will want to make your bias tape. If you don't know how there are a ton of tutorials out there. You are first attaching the bias tape to the back of the table cloth.


Post a Comment